Table of contents
No headings in the article.
In this series, we will try to display data in laravel and inertiajs. The case study we use is a product, our first task is to create a model file, a product controller. Run the following command:
php artisan make:model Product -mfrc
The above command will create a model, factory, migrate, resource, and Product controller files.
Model: app\Models\Product.php
<?php

namespace App\Models;

use Illuminate\Database\Eloquent\Factories\HasFactory;
use Illuminate\Database\Eloquent\Model;

class Product extends Model
{
    use HasFactory;

    protected $fillable = ["title", "description", "price"];
}
in the model above we add the code:
protected $fillable = ["title", "description", "price"];
additional to define the attribute in $fillable in order to perform database operations on the table.
Controller: app\Http\Controllers\ProductController.php
<?php

namespace App\Http\Controllers;

use App\Models\Product;
use Illuminate\Http\Request;

class ProductController extends Controller
{
    /**
     * Display a listing of the resource.
     *
     * @return \Illuminate\Http\Response
     */
    public function index()
    {
        //
    }

    /**
     * Show the form for creating a new resource.
     *
     * @return \Illuminate\Http\Response
     */
    public function create()
    {
        //
    }

    /**
     * Store a newly created resource in storage.
     *
     * @param  \Illuminate\Http\Request  $request
     * @return \Illuminate\Http\Response
     */
    public function store(Request $request)
    {
        //
    }

    /**
     * Display the specified resource.
     *
     * @param  \App\Models\Product  $product
     * @return \Illuminate\Http\Response
     */
    public function show(Product $product)
    {
        //
    }

    /**
     * Show the form for editing the specified resource.
     *
     * @param  \App\Models\Product  $product
     * @return \Illuminate\Http\Response
     */
    public function edit(Product $product)
    {
        //
    }

    /**
     * Update the specified resource in storage.
     *
     * @param  \Illuminate\Http\Request  $request
     * @param  \App\Models\Product  $product
     * @return \Illuminate\Http\Response
     */
    public function update(Request $request, Product $product)
    {
        //
    }

    /**
     * Remove the specified resource from storage.
     *
     * @param  \App\Models\Product  $product
     * @return \Illuminate\Http\Response
     */
    public function destroy(Product $product)
    {
        //
    }
}
Migration: database\migrations\2022_04_08_085412_create_products_table.php
<?php

use Illuminate\Database\Migrations\Migration;
use Illuminate\Database\Schema\Blueprint;
use Illuminate\Support\Facades\Schema;

return new class extends Migration
{
    /**
     * Run the migrations.
     *
     * @return void
     */
    public function up()
    {
        Schema::create('products', function (Blueprint $table) {
            $table->id();
            $table->string('title');
            $table->text('description')->nullable();
            $table->bigInteger('price')->nullable();
            $table->integer('publish')->default(0);
            $table->timestamps();
        });
    }

    /**
     * Reverse the migrations.
     *
     * @return void
     */
    public function down()
    {
        Schema::dropIfExists('products');
    }
};
In the migrate file, define the attribute table that we will create:
   $table->string('title');
   $table->text('description')->nullable();
   $table->bigInteger('price')->nullable();
   $table->integer('publish')->default(0);
Then to generate the table run the migrate command:
php artisan migrate
Generate Dummy Data with Factory
Open the factory file and define the attributes.
Factory: database\factories\ProductFactory.php
<?php

namespace Database\Factories;

use Illuminate\Database\Eloquent\Factories\Factory;

/**
 * @extends \Illuminate\Database\Eloquent\Factories\Factory<\App\Models\Product>
 */
class ProductFactory extends Factory
{
    /**
     * Define the model's default state.
     *
     * @return array<string, mixed>
     */
    public function definition()
    {
        return [
            'title' => $this->faker->company(),
            'description' => $this->faker->text(),
            'price' => $this->faker->randomNumber(),
        ];
    }
}
in the script above we have added a script for factory, so that later we can generate or add dummy data to the product table.
            'title' => $this->faker->company(),
            'description' => $this->faker->text(),
            'price' => $this->faker->randomNumber(),
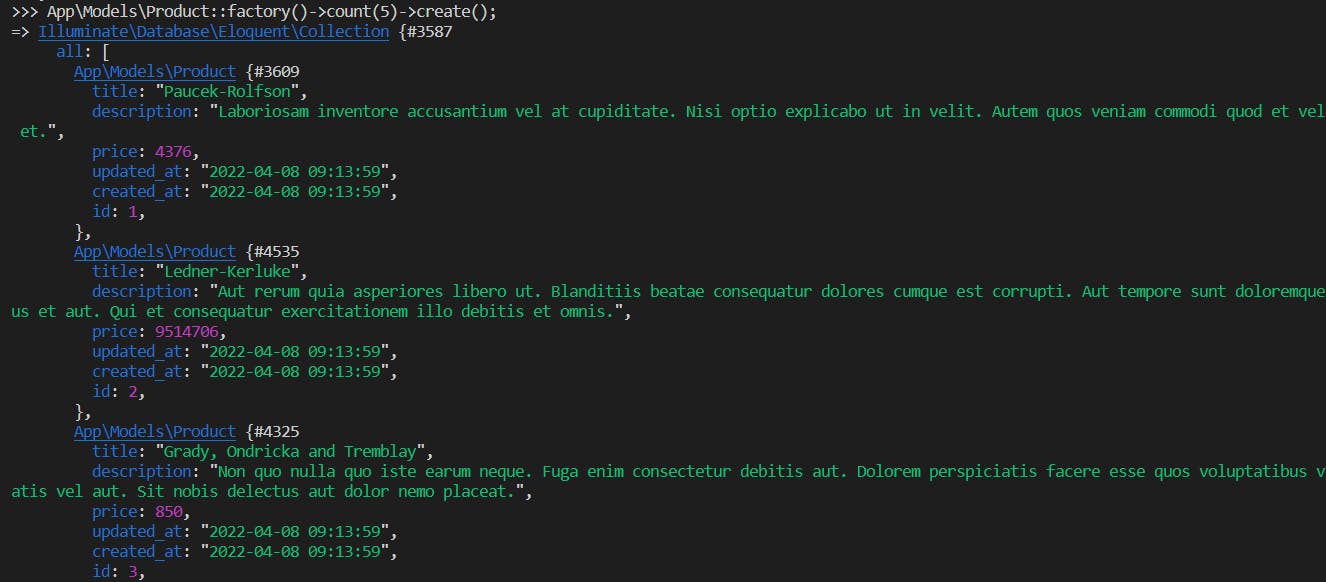
Run factory through tinker
php artisan tinker
type:
App\Models\Product::factory()->count(5)->create();
then enter.

Congratulations, we have successfully added dummy data to the Product table.
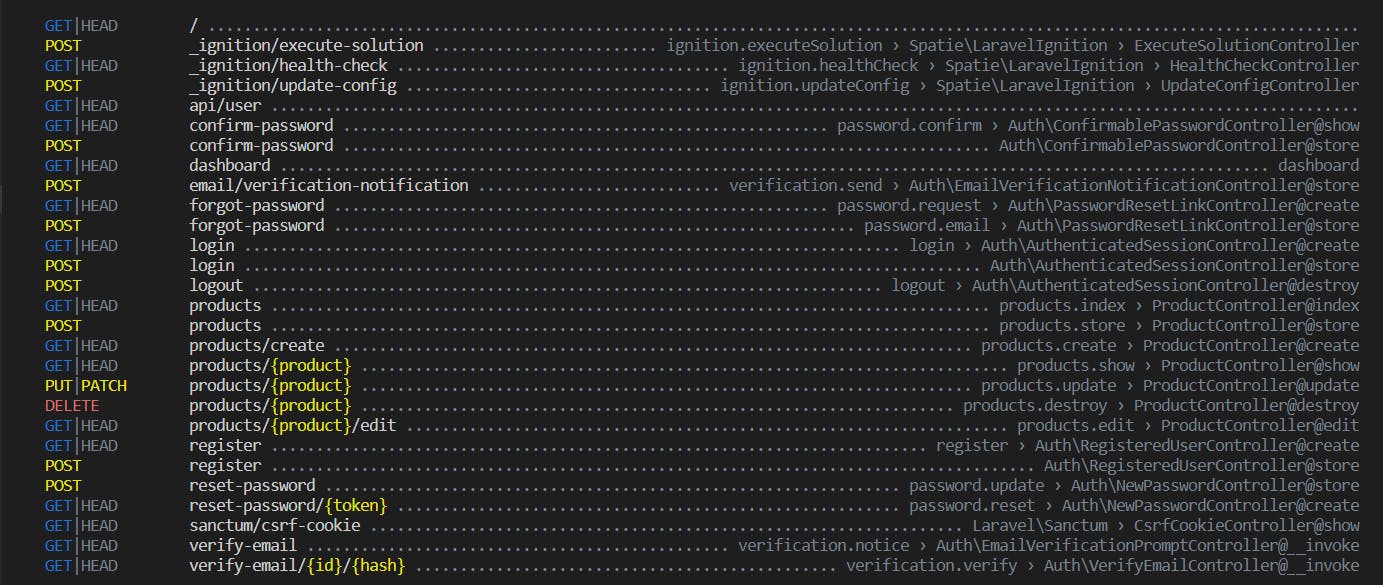
Next we create a route to access product resources as below:
Route::middleware(['auth', 'verified'])->group(function() {
    Route::resource('products', ProductController::class);
});
Run the following command to see a list of product lists:
php artisan route:list

But if we only want to display the route list of the product then run the following command:
php artisan route:list --name=product

Display Data With Table
In the ProductController in the index method, add a script like this:
    public function index()
    {
        $departments = Department::orderBy('name')->get();

        return Inertia::render('Product/Index', [
            'products' => $products
        ]);
    }
Don't forget to call the Product model class:
use Inertia\Inertia;
use App\Models\Product;
Next, create a component to display a list of products in the products directory. Pages/Product/Index.vue, then copy the following script:
<script setup>
import BreezeAuthenticatedLayout from '@/Layouts/Authenticated.vue';
import { Head } from '@inertiajs/inertia-vue3';
</script>

<template>
    <Head title="Dashboard" />

    <BreezeAuthenticatedLayout>
        <template #header>
            <h2 class="font-semibold text-xl text-gray-800 leading-tight">
                Department
            </h2>
        </template>

        <div class="py-12">
            <div class="max-w-7xl mx-auto sm:px-6 lg:px-8">
                <div class="bg-white overflow-hidden shadow-sm sm:rounded-lg">
                    <div class="p-6 bg-white border-b border-gray-200">
                        <table class="table-fixed">
                            <thead>
                                <tr>
                                    <th>Title</th>
                                    <th>Description</th>
                                    <th>Price</th>
                                </tr>
                            </thead>
                            <tbody>
                                <tr v-for="product in products" :key="product.id">
                                    <td>{{ product.title }}</td>
                                    <td>{{ product.description }}</td>
                                    <td>{{ product.price }}</td>
                                </tr>
                            </tbody>
                        </table>

                    </div>
                </div>
            </div>
        </div>
    </BreezeAuthenticatedLayout>
</template>

<script>
    export default {
        components : {
            BreezeAuthenticatedLayout,
        },

        props: {
            products: Object,
        }
    }
</script>
The script above is a copy of the Dashboard.vue file, but we have added a script to the table section.
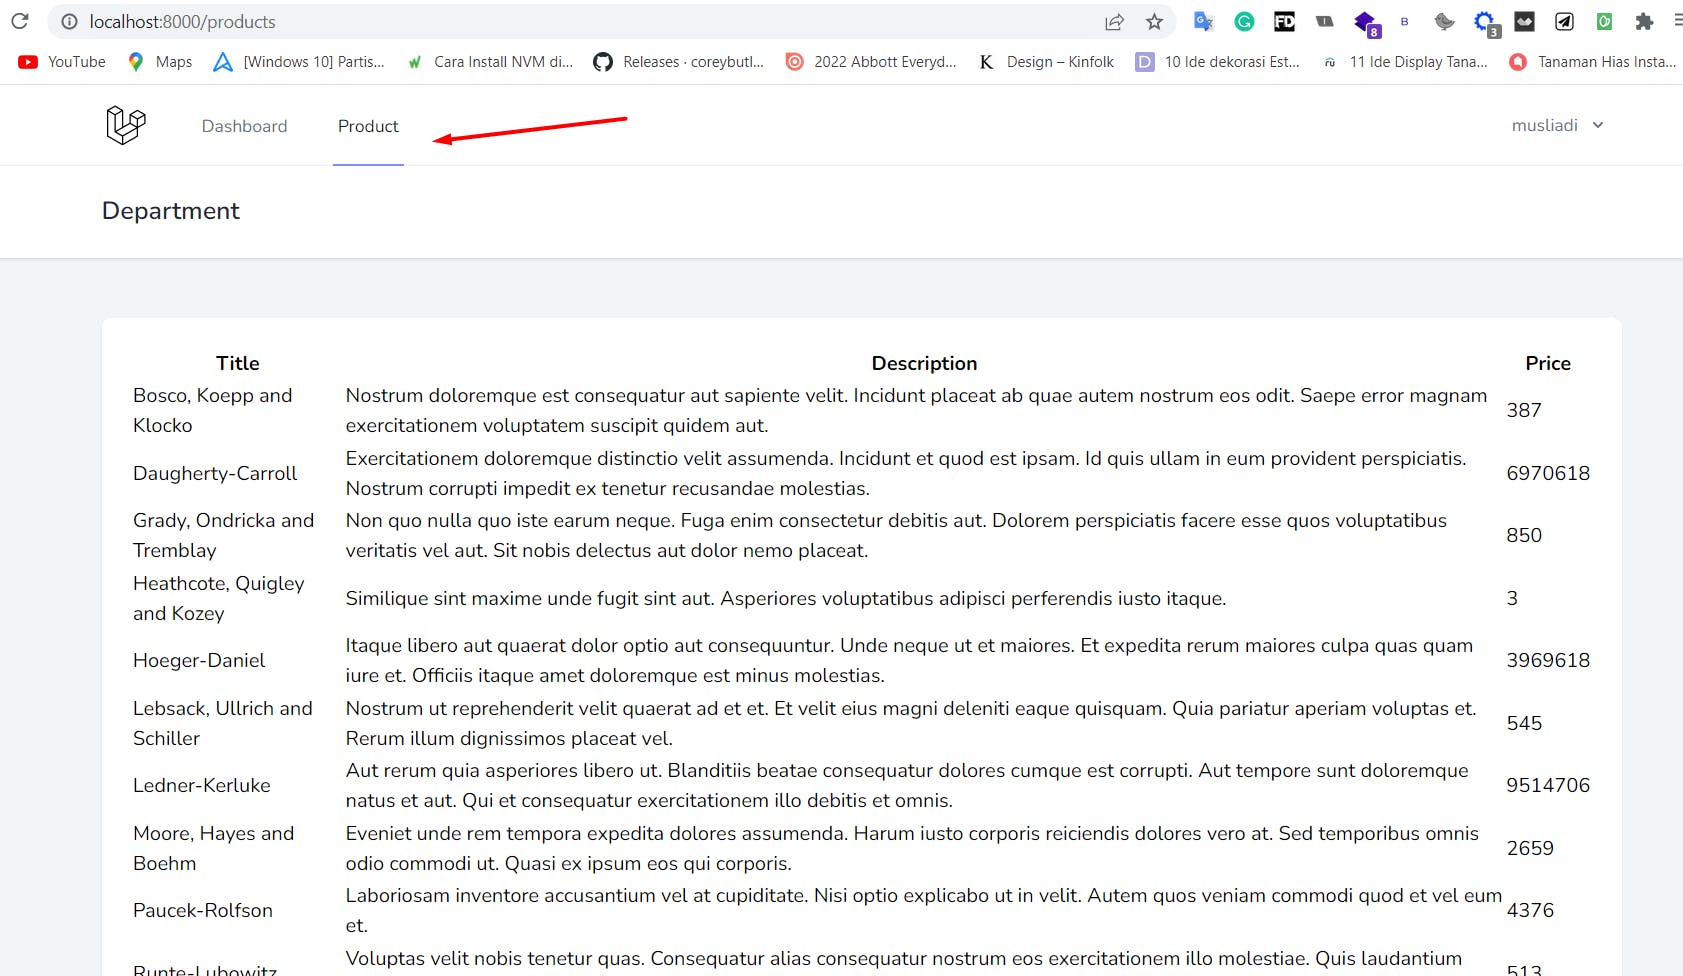
Then don't forget to add a menu to access the route of the product, the menu is in the js/Layouts/Authenticated.vue file. Just copy the script below.
<script setup>
import { ref } from 'vue';
import BreezeApplicationLogo from '@/Components/ApplicationLogo.vue';
import BreezeDropdown from '@/Components/Dropdown.vue';
import BreezeDropdownLink from '@/Components/DropdownLink.vue';
import BreezeNavLink from '@/Components/NavLink.vue';
import BreezeResponsiveNavLink from '@/Components/ResponsiveNavLink.vue';
import { Link } from '@inertiajs/inertia-vue3';

const showingNavigationDropdown = ref(false);
</script>

<template>
    <div>
        <div class="min-h-screen bg-gray-100">
            <nav class="bg-white border-b border-gray-100">
                <!-- Primary Navigation Menu -->
                <div class="max-w-7xl mx-auto px-4 sm:px-6 lg:px-8">
                    <div class="flex justify-between h-16">
                        <div class="flex">
                            <!-- Logo -->
                            <div class="shrink-0 flex items-center">
                                <Link :href="route('dashboard')">
                                    <BreezeApplicationLogo class="block h-9 w-auto" />
                                </Link>
                            </div>

                            <!-- Navigation Links -->
                            <div class="hidden space-x-8 sm:-my-px sm:ml-10 sm:flex">
                                <BreezeNavLink :href="route('dashboard')" :active="route().current('dashboard')">
                                    Dashboard
                                </BreezeNavLink>
                                <BreezeNavLink :href="route('products.index')" :active="route().current('products.index')">
                                    Product
                                </BreezeNavLink>
                            </div>
                        </div>

                        <div class="hidden sm:flex sm:items-center sm:ml-6">
                            <!-- Settings Dropdown -->
                            <div class="ml-3 relative">
                                <BreezeDropdown align="right" width="48">
                                    <template #trigger>
                                        <span class="inline-flex rounded-md">
                                            <button type="button" class="inline-flex items-center px-3 py-2 border border-transparent text-sm leading-4 font-medium rounded-md text-gray-500 bg-white hover:text-gray-700 focus:outline-none transition ease-in-out duration-150">
                                                {{ $page.props.auth.user.name }}

                                                <svg class="ml-2 -mr-0.5 h-4 w-4" xmlns="http://www.w3.org/2000/svg" viewBox="0 0 20 20" fill="currentColor">
                                                    <path fill-rule="evenodd" d="M5.293 7.293a1 1 0 011.414 0L10 10.586l3.293-3.293a1 1 0 111.414 1.414l-4 4a1 1 0 01-1.414 0l-4-4a1 1 0 010-1.414z" clip-rule="evenodd" />
                                                </svg>
                                            </button>
                                        </span>
                                    </template>

                                    <template #content>
                                        <BreezeDropdownLink :href="route('logout')" method="post" as="button">
                                            Log Out
                                        </BreezeDropdownLink>
                                    </template>
                                </BreezeDropdown>
                            </div>
                        </div>

                        <!-- Hamburger -->
                        <div class="-mr-2 flex items-center sm:hidden">
                            <button @click="showingNavigationDropdown = ! showingNavigationDropdown" class="inline-flex items-center justify-center p-2 rounded-md text-gray-400 hover:text-gray-500 hover:bg-gray-100 focus:outline-none focus:bg-gray-100 focus:text-gray-500 transition duration-150 ease-in-out">
                                <svg class="h-6 w-6" stroke="currentColor" fill="none" viewBox="0 0 24 24">
                                    <path :class="{'hidden': showingNavigationDropdown, 'inline-flex': ! showingNavigationDropdown }" stroke-linecap="round" stroke-linejoin="round" stroke-width="2" d="M4 6h16M4 12h16M4 18h16" />
                                    <path :class="{'hidden': ! showingNavigationDropdown, 'inline-flex': showingNavigationDropdown }" stroke-linecap="round" stroke-linejoin="round" stroke-width="2" d="M6 18L18 6M6 6l12 12" />
                                </svg>
                            </button>
                        </div>
                    </div>
                </div>

                <!-- Responsive Navigation Menu -->
                <div :class="{'block': showingNavigationDropdown, 'hidden': ! showingNavigationDropdown}" class="sm:hidden">
                    <div class="pt-2 pb-3 space-y-1">
                        <BreezeResponsiveNavLink :href="route('dashboard')" :active="route().current('dashboard')">
                            Dashboard
                        </BreezeResponsiveNavLink>
                        <BreezeResponsiveNavLink :href="route('products.index')" :active="route().current('products.index')">
                            Product
                        </BreezeResponsiveNavLink>
                    </div>

                    <!-- Responsive Settings Options -->
                    <div class="pt-4 pb-1 border-t border-gray-200">
                        <div class="px-4">
                            <div class="font-medium text-base text-gray-800">{{ $page.props.auth.user.name }}</div>
                            <div class="font-medium text-sm text-gray-500">{{ $page.props.auth.user.email }}</div>
                        </div>

                        <div class="mt-3 space-y-1">
                            <BreezeResponsiveNavLink :href="route('logout')" method="post" as="button">
                                Log Out
                            </BreezeResponsiveNavLink>
                        </div>
                    </div>
                </div>
            </nav>

            <!-- Page Heading -->
            <header class="bg-white shadow" v-if="$slots.header">
                <div class="max-w-7xl mx-auto py-6 px-4 sm:px-6 lg:px-8">
                    <slot name="header" />
                </div>
            </header>

            <!-- Page Content -->
            <main>
                <slot />
            </main>
        </div>
    </div>
</template>
Then makes the dashboard page, there will appear a new menu named 'product', then click to display a list of data.

Congratulations, in this session we have successfully displayed a list of data with inertia.

